

Repairing porches comes down to seven essential steps: inspect the structure for damage, replace rotted wood, secure loose boards and railings, refinish or repaint surfaces, seal against moisture, upgrade support posts if needed, and maintain regularly to prevent future problems. For Canadian homeowners, where freeze-thaw cycles and heavy snow accelerate wear, these repairs aren’t optional. A compromised porch doesn’t just look bad. It becomes a safety hazard and can lead to more expensive structural damage if water reaches your home’s foundation or frame.
Most porch repairs fall into two categories: surface fixes you can tackle in a weekend and structural work that requires careful assessment. The good news? You can handle the majority of common issues yourself with basic carpentry skills and the right materials. Knowing when to call a professional matters too, especially if you spot sagging beams, cracked support posts, or separation from the house.
This guide walks through the complete repair process, from identifying what’s actually broken to selecting materials that stand up to Canadian weather. You’ll learn which repairs to prioritize, how to spot hidden damage before it spreads, and practical techniques that extend your porch’s life by years. Whether you’re dealing with peeling paint, wobbly railings, or soft floorboards, these steps give you a clear path from problem to solution.
How We Selected These Repair Steps
We chose these seven repair steps based on what actually goes wrong with Canadian porches and what homeowners can realistically fix. Each method addresses problems we see repeatedly in our climate, rot from freeze-thaw cycles, moisture damage from heavy snow and rain, and structural wear from temperature swings.
Cost-effectiveness mattered. We prioritized repairs that deliver maximum protection and longevity for reasonable investment, whether you hire a contractor or tackle the work yourself. DIY feasibility was also key: most of these steps are manageable for homeowners with basic tools and skills, though we’re clear about when professionals should step in.
Finally, we considered impact. These repairs don’t just prevent further damage, they restore your porch’s appearance and safety, directly boosting curb appeal and home value. We skipped purely cosmetic fixes in favour of repairs that address underlying problems while improving how your porch looks and performs for years to come.
1. Assess Structural Integrity and Safety Hazards
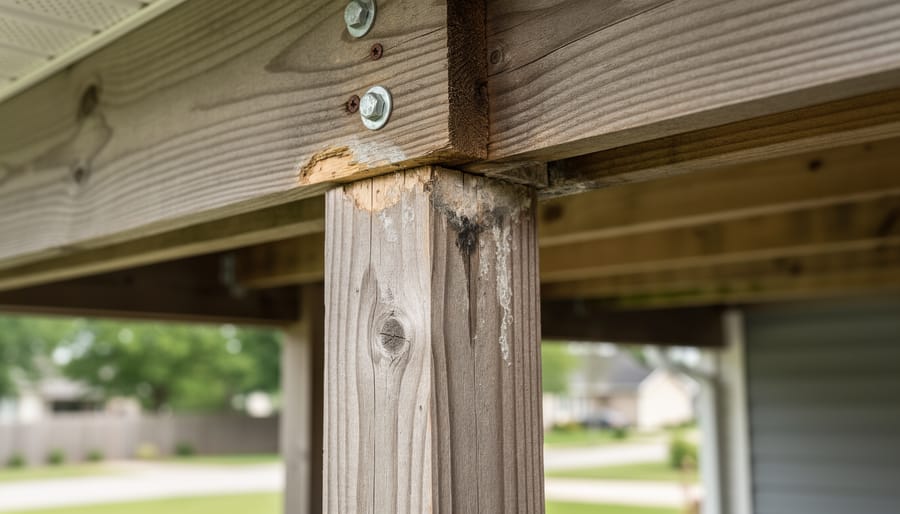
Start at the foundation and work your way up. Before you replace a single board or apply fresh paint, you need to understand what you’re working with, and whether your porch is safe to stand on.
Begin by examining the foundation where your porch meets the house and where support posts anchor to the ground. Look for cracks wider than a quarter-inch, crumbling concrete, or gaps between the porch and the house structure. In Canadian climates, freeze-thaw cycles cause moisture to expand and contract repeatedly, which accelerates concrete deterioration and can shift entire porch structures over time.
Check these critical components systematically:
- Foundation and footings for cracks, settling, or separation from the house
- Support posts for rot at the base, splitting, or lean
- Joists underneath the decking for sagging, soft spots, or visible decay
- Ledger board (where the porch attaches to your house) for secure fastening and water damage
- Railings for wobble, rust, or loose connections
Use a screwdriver to probe wood posts and joists. If the tool sinks in easily or the wood feels spongy, you’ve found rot. Surface discoloration or peeling paint is cosmetic; structural wood that crumbles under pressure is serious.
Call a professional immediately if you discover significant sagging, posts that aren’t plumb, major foundation cracks, or extensive rot in load-bearing members. These aren’t DIY fixes, they’re safety hazards that require proper engineering and often building permits.
2. Replace Rotted or Damaged Decking Boards
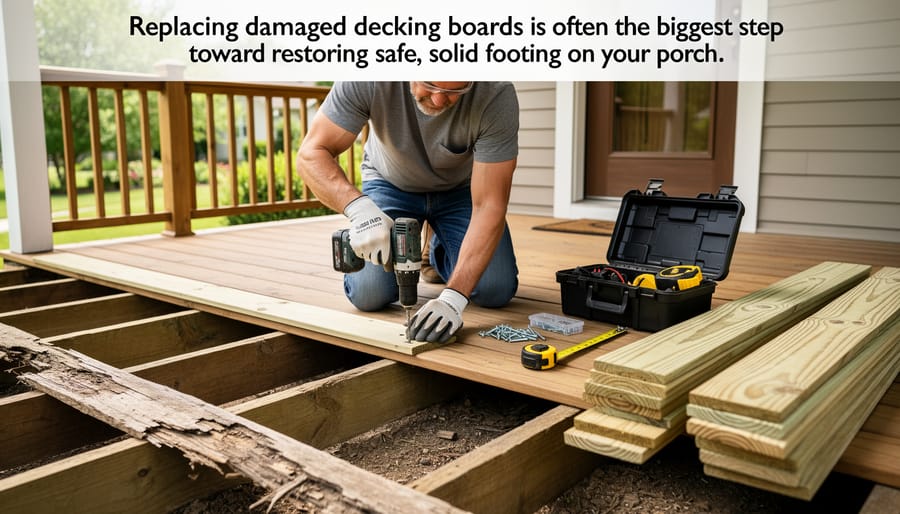
Replacing damaged decking boards is one of the most common porch repairs Canadian homeowners face, especially after harsh winters. Start by inspecting each board for soft spots, discoloration, splintering, or visible rot. Press a screwdriver into suspect areas, if it sinks in easily, the wood is compromised and needs replacement.
To remove a damaged board, first check whether it’s nailed or screwed down. For nails, use a pry bar with a block of wood underneath to protect adjacent boards. Work carefully from one end, loosening fasteners progressively to avoid cracking surrounding planks. Screws are simpler: back them out with a drill, then lift the board free. If a board is wedged between others, a circular saw set to the exact depth of the board lets you cut it into sections for easier removal without damaging the joists below.
Choosing the right replacement material matters in Canada’s extreme climate. Pressure-treated lumber rated for ground contact offers solid rot resistance at a reasonable price. For longer-lasting options, consider composite decking, which resists moisture, warping, and UV damage without regular staining. Cedar provides natural beauty and moderate durability but costs more upfront.
Install new boards with the crown (slight upward curve visible along the edge) facing up for proper water runoff. Space boards consistently using a nail as a spacer, and fasten them with corrosion-resistant deck screws, two per joist crossing. Pre-drill holes near board ends to prevent splitting, especially in hardwoods or pressure-treated lumber.
3. Repair or Rebuild Porch Railings
Loose or damaged railings are a serious safety hazard that can lead to falls and injuries, particularly for children and elderly visitors. If your railings wobble when you grip them, it’s time to take action.
Start by inspecting each section of railing to identify the problem areas. Grab the top rail firmly and shake it, any movement indicates loose connections that need attention. Check where posts connect to the porch deck and where balusters attach to the top and bottom rails. Often, the issue is simply loose screws or nails that have worked free over time due to temperature changes and moisture.
Tighten existing hardware first. Use a drill or screwdriver to secure loose screws, and replace any stripped fasteners with slightly larger ones or move them to fresh wood. For nails that have loosened, pull them out and replace with galvanized deck screws, which hold much better. If posts wiggle at the base, you may need to add metal brackets or blocking underneath for additional support.
When balusters are cracked or rotted, replace them individually rather than rebuilding the entire railing. Measure carefully and cut replacements to match the existing pattern. For posts showing significant rot at the base, you’ll need to sister a new post alongside or replace the entire post, which requires temporary bracing for safety during the repair.
Canadian building codes require railings on porches higher than 600mm (24 inches) from the ground, with balusters spaced no more than 100mm (4 inches) apart to prevent children from slipping through. The railing must withstand a horizontal force of at least 0.5 kN without failure. If your porch was built before current codes took effect, bringing railings up to standard during repairs protects your family and satisfies insurance requirements.
4. Fix Sagging or Uneven Porch Floors
A sagging porch floor isn’t just unsightly, it signals underlying problems that will worsen if ignored. Start by identifying the cause: walk the porch slowly, noting areas that feel soft, bouncy, or visibly dipped. Common culprits include soil settling beneath support piers, rotted or undersized floor joists, inadequate support posts, or deteriorated rim joists where the porch attaches to the house. In Canadian climates, freeze-thaw cycles accelerate settling and moisture damage, making early diagnosis essential.
For rotted joists, sistering is often the most practical solution. This involves fastening a new joist alongside the damaged one using galvanized or exterior-grade screws, effectively doubling the support without removing the old joist. If rot is extensive, full joist replacement becomes necessary, a job best left to professionals if you’re uncomfortable working in confined crawl spaces.
Sagging caused by settling or inadequate support calls for additional posts or piers. Jack up the affected area gradually using adjustable floor jacks, then install pressure-treated posts on concrete footings below the frost line to prevent future heaving. For minor unevenness, tapered shims between joists and beams can restore level without major structural work.
Leveling a porch is delicate work. Lift too quickly and you risk cracking siding or windows; too little and the problem persists. If your porch has dropped more than two inches, shows extensive rot, or connects to critical load-bearing structures, hire a structural engineer or experienced contractor. The cost of professional assessment far outweighs the risk of a collapse or improperly executed repair that compromises your home’s integrity.
5. Seal and Waterproof to Prevent Future Damage
Once your porch structure is sound and all repairs are complete, protecting the wood from Canada’s harsh weather becomes essential. Sealing and waterproofing prevents moisture infiltration, UV degradation, and the freeze-thaw damage that shortens porch lifespan across much of the country.
Choose your protective treatment based on your porch’s exposure and desired appearance:
- Clear sealers: preserve natural wood grain, ideal for new cedar or pressure-treated decks, reapply every 1-2 years
- Semi-transparent stains: add subtle colour while showing wood texture, better UV protection than clear products, last 2-3 years
- Solid-colour stains: opaque finish hides imperfections, excellent moisture barrier, good for older wood, durability of 3-4 years
- Paint: maximum protection and colour options, best for railings and trim, requires thorough prep but lasts 5-7 years with proper maintenance
Application timing matters significantly in Canadian climates. Apply products when temperatures will stay above 10°C for at least 48 hours, with no rain forecast. Late spring and early fall offer ideal conditions, avoiding summer’s intense UV and winter’s moisture. Never seal damp wood; let it dry completely after cleaning or repairs.
For products that withstand Canadian weather, look for formulations rated for extreme temperature swings and high moisture exposure. Oil-based sealers penetrate deeper but require mineral spirits for cleanup, while water-based options clean easily and dry faster. Read manufacturer specs carefully, as some products fail in sustained freezing conditions.
Establish a maintenance rhythm: inspect annually each spring, clean the surface, and reapply sealer or stain before the protective layer wears through completely. Catching wear early prevents water from reaching bare wood, where rot begins.
6. Address Concrete Porch Cracks and Settling
Concrete porches face relentless punishment from Canadian winters. Freeze-thaw cycles force water into tiny fissures, where it expands when frozen and cracks the slab wider with each cold snap. Left unchecked, hairline cracks become structural problems, settling turns into trip hazards, and your porch deteriorates from cosmetic eyesore to safety liability.
Start by cleaning cracks thoroughly with a wire brush and shop vacuum, debris prevents proper adhesion. For hairline cracks under 6 mm wide, use a concrete crack filler or flexible sealant that tolerates movement. Apply with a caulking gun, overfill slightly, then smooth with a putty knife. These products cure quickly and handle seasonal expansion without re-cracking.
Wider cracks and deeper damage demand epoxy injection or hydraulic cement. Epoxy bonds aggressively and waterproofs simultaneously, making it ideal for structural repairs. Mix according to package directions, inject from bottom to top using a caulking gun or syringe applicator, and allow 24 hours to cure. Hydraulic cement works well for corners and edges where the concrete has chipped away, it sets fast even in damp conditions.
Settling creates uneven surfaces and standing water that accelerates decay. Minor settling (under 2 cm) responds to mudjacking, where contractors pump grout beneath the slab to lift it level. More severe heaving or sinking usually requires professional assessment; the underlying cause, poor drainage, soil erosion, inadequate base, must be fixed before resurfacing.
For widespread surface damage, concrete resurfacer provides a fresh skin over the old porch. Clean the surface, etch with muriatic acid, then trowel on the resurfacer in thin coats. Two coats typically restore a smooth finish that hides minor imperfections and extends the porch’s life by another decade.
7. Upgrade Hardware and Fasteners
Overlooked hardware often causes more porch damage than the boards themselves. Rusted nails pop up, corroded screws lose their grip, and deteriorated brackets fail, especially after Canadian winters cycle moisture into every fastener. Upgrading to corrosion-resistant hardware stops this slow-motion collapse before it starts.
Replace every rusty nail and screw you find. Standard steel fasteners corrode quickly in humid climates or coastal regions where salt spray accelerates deterioration. Switch to hot-dipped galvanized, stainless steel, or coated deck screws rated for exterior use. These materials resist moisture penetration and won’t streak your boards with rust stains.
Pay special attention to joist hangers, post brackets, and ledger board connections. These structural fasteners bear significant weight, and corrosion compromises their load capacity long before visible failure occurs. Swap any rusted brackets for galvanized or powder-coated alternatives.
When replacing fasteners, drill pilot holes to prevent splitting, particularly in hardwoods or near board ends. Use screws rather than nails wherever possible, they hold tighter and allow for easier future repairs without prying or damaging surrounding wood.
Check fastener spacing too. Building codes typically require screws every 16 inches along joists. Adding fasteners where spacing exceeds this standard eliminates bounce and squeaks while distributing loads more evenly across your porch structure.
Common Questions About Porch Repairs
How much does porch repair typically cost in Canada?
Simple repairs like replacing a few boards or tightening railings might run $200 to $500, while more extensive structural work involving joists, posts, or complete deck replacement can range from $2,000 to $10,000 or more. Your final cost depends on materials chosen, porch size, accessibility, and local labour rates.
Can I tackle porch repairs myself or should I hire a professional?
Cosmetic fixes, replacing individual boards, applying sealant, tightening hardware, are well within reach for most DIYers with basic tools. However, structural repairs involving foundations, load-bearing posts, or extensive rot should be left to licensed contractors who understand building codes and can ensure your porch remains safe.
How often should I inspect my porch for damage?
Conduct a thorough visual inspection twice yearly, ideally in spring after the freeze-thaw cycle and again in fall before winter sets in. Check for loose boards, cracked concrete, rotted wood, rust on fasteners, and any shifting or settling between seasons.
What’s the lifespan of different porch materials?
Pressure-treated wood typically lasts 15 to 25 years with proper maintenance, while composite decking can reach 25 to 30 years or longer. Concrete porches often last 50 years or more, though surface repairs may be needed sooner in harsh climates. Cedar and other naturally rot-resistant woods fall somewhere between 20 and 30 years when sealed regularly.
When is the best time of year to repair a porch in Canada?
Late spring through early fall offers the most favourable conditions, dry weather, moderate temperatures, and longer daylight hours. Avoid repairs during winter freezes or wet seasons, as moisture and cold can interfere with adhesives, sealants, and curing times for stains and finishes.
Keep in mind that neglecting minor issues often leads to costlier repairs down the line. A small crack in concrete or a single rotted board can spread quickly when exposed to Canadian winters, turning a straightforward fix into a major project. Staying proactive with inspections and addressing problems early saves both money and headaches.
Repairing porches doesn’t have to be overwhelming when you tackle it methodically. By working through these seven steps, from assessing structural integrity to upgrading hardware, you’ll protect your home’s value, ensure your family’s safety, and boost curb appeal that makes a real difference in Canadian neighbourhoods.
Start with a thorough inspection this weekend. Identify what needs immediate attention versus what can wait, then work through repairs systematically rather than all at once. Small fixes now prevent expensive replacements later, especially given our harsh freeze-thaw cycles.
Ready to take your home improvement skills further? Subscribe to our newsletter for practical tips on maintaining and upgrading your Canadian home year-round.